Running KAIR on Apple Silicon: My First Look at Image Restoration
I have spent some time with photography and digital image post-processing, so I have a basic familiarity with concepts such as exposure, ISO, and white balance. Those experiences also gave me an intuitive sense of how changes in image quality can look.
To learn more about image restoration, I recently tried configuring and running KAIR, an image restoration toolbox based on PyTorch. It includes code for tasks such as image denoising, super-resolution, and deblurring, as well as models including DnCNN, USRNet, and SwinIR.
I still know very little about the theory and model design behind image restoration. For this first attempt, my goal was fairly simple: set up the code, complete one test, and look carefully at what appeared in the output images.
Environment and Setup
I used an Apple M4 MacBook Air running macOS, with Python 3.11. I created a separate Python virtual environment inside the repository and installed the dependencies according to the project instructions.
After the initial installation, the test script still required an additional matplotlib dependency:
ModuleNotFoundError: No module named 'matplotlib'
The test could continue after installing it. This was a small issue, but it reminded me that when setting up research code, it is useful to check the dependencies required by the actual entry point, not only those listed in the main setup instructions.
Downloading a Model and Running the Test
I first ran the repository’s pretrained model download script:
python main_download_pretrained_models.py
This downloaded model_zoo/dncnn3.pth. For the Set12 denoising test, however, I used the existing dncnn_25.pth model:
python main_test_dncnn.py \
  --model_name dncnn_25 \
  --testset_name set12 \
  --noise_level_img 25
The noise_level_img 25 argument specifies the noise level used during testing. To keep the record precise, the final test used dncnn_25.pth, rather than the dncnn3.pth downloaded in the previous step.
The test set contains 12 images. The model has 555,137 parameters, and the average result was:
Average PSNR/SSIM(RGB) - set12_dncnn_25
PSNR: 30.43 dB
SSIM: 0.8617
These numbers show that the test completed, but they do not tell me how the model behaves on different kinds of images or how it treats texture. I therefore compared the input and output images one by one. The following observations are preliminary impressions from this run, rather than rigorous experimental conclusions.
Looking at the Images: Noise Can Disappear Along with Texture
The following comparisons come from this run. In each pair, the upper image is the test image and the lower image is the DnCNN output. I kept several representative examples so that the differences could be checked directly.
01: The Background Noise Is Suppressed Most Clearly
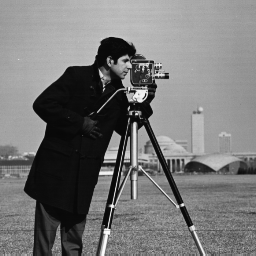
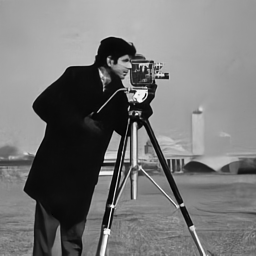
In 01, the stripe-like noise in the background is noticeably reduced. The main structures of the person, camera, and tripod are still preserved reasonably well. The improvement is easy to see, while the main subject does not appear to lose the same amount of structure.
02: The Brick Texture on the Wall Becomes Smoother
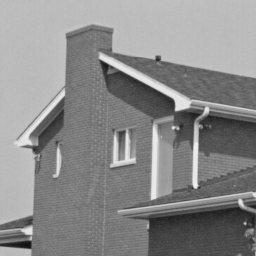
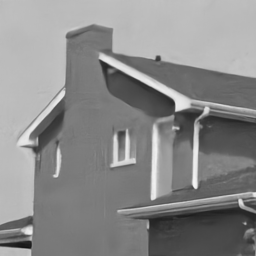
02 shows another side of the result. The overall brightness and the shape of the roof remain clear, but the fine, repeated brick texture on the wall is noticeably reduced.
This made me realize that denoising cannot be judged only by whether the noise has become less visible. Fine regular textures and noise may have similar local patterns. When the model suppresses the noise, some of the texture may be affected as well. The exact reason would depend on factors such as the noise, the image content, and the model design, which I cannot explain from this one test alone.
03: Some Surface Detail in the Vegetables Is Smoothed Out
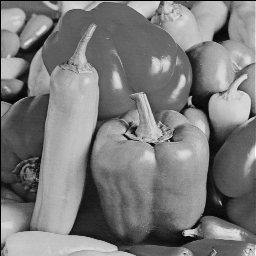
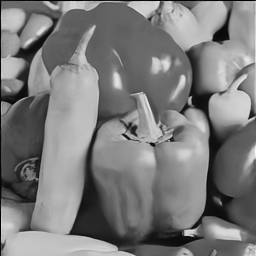
In 03, the overall shapes and brightness relationships remain clear, but the small variations and surface textures of the vegetables appear less rich. This kind of change is less concentrated than in the brick wall, but it is easy to notice in natural objects whose textures do not follow a simple regular pattern.
05: The Edges of the Butterfly’s Wing Become Smoother
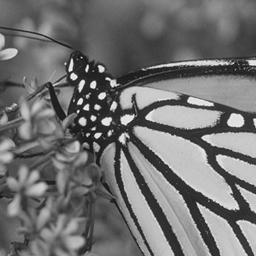
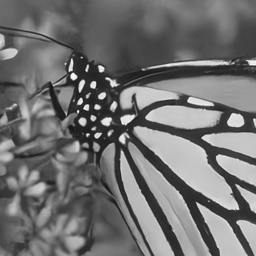
The main black-and-white pattern on the wing is still present in 05, but the small irregularities and local sharpness along the dark stripes are reduced. The larger structures remain, while some of the smaller edge details become softer.
07: The Feather Details Become Noticeably Softer
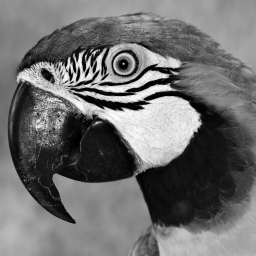
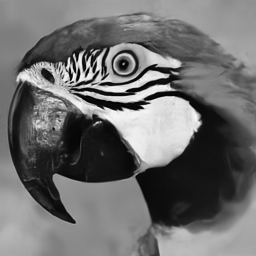
In 07, the parrot’s outline and face are largely preserved, but the fine layers of the feathers become noticeably softer. For visual perception, details such as feathers, hair, fabric, and skin texture often contribute strongly to a sense of realism. The output looks cleaner, but also slightly more smoothed over.
What This Run Made Me Think About
After completing the DnCNN test, I found that the model could suppress the random noise in the background reasonably well. At the same time, some high-frequency details, including the brick texture and gaps in the wall and parts of facial detail, also became smoother.
This was the first time I experienced quite directly that image denoising involves a trade-off between suppressing noise and preserving detail. I still do not understand the specific design principles behind the model, but the result made me want to read more about the papers and the choices behind these models.
PSNR and SSIM Are Not a Substitute for Looking at the Images
The average PSNR of 30.43 dB and SSIM of 0.8617 provide a summary of the overall result, but they do not describe the difference between 01 and 02, or directly express how much of the brick texture has been smoothed away. Looking at individual images reveals behavior that a single average number cannot show.
Denoising Involves a Trade-off in Fidelity
DnCNN aims to recover a cleaner image from a noisy one, but “cleaner” and “more detailed” cannot always be achieved at the same time. When noise resembles real texture, removing it may also affect the texture. I do not yet have enough theoretical background to explain exactly how the model makes this trade-off, but this small test made the problem much more concrete to me.
Running the Code Is Only the Beginning
This experiment gave me a first sense of the connection between the environment, the model, the test parameters, and the final images:
environment setup
→ model and test set
→ noise level
→ inference output
→ PSNR / SSIM
→ looking at individual images
Only after looking back at the output images did the metrics begin to feel connected to specific visual changes.
What I Want to Try Next
I would like to try different noise levels and other DnCNN models, and then run one of the super-resolution models. I also want to read the test scripts and model implementation to understand where preprocessing, noise generation, inference, and metric calculation take place.
This was only a small setup and testing exercise, but it was my first real contact with the code organization of an image restoration project. More than simply seeing the final output, I found myself wanting to understand why the model produced that particular output.
For me, the interesting part was not simply that the project could run. It was having a chance to observe what an image restoration model actually does: some noise disappears, while some fine textures become smoother. Image restoration is not only about making an image “cleaner”; there is always a balance between removing noise and preserving details. I still know very little about the principles underneath, but this small experiment made me more curious about how these models are designed and how they make that choice.